Hello Again! Today I’m reflecting on what I learned about drawing from Nelson Shanks, one of the first teachers I had at the Art Students League (ASL) of NYC. I studied with Nelson during the Fall semester 2009 (September-December).
For anyone unfamiliar with the ASL, they offer a variety of workshops and courses including semester long classes. ASL semester courses are generally three hours every day M-F. In a five day a week class the teacher comes in 2-3 of those days to give demonstrations and individual advice. The rest of the week you are still working from models but the instructor’s assistants, called monitors, keep things running and may also offer you advice.
I couldn’t believe that I got into Nelson’s class my first semester at the ASL but I jumped at the chance to study with him. Nelson’s class was unique in that he kept two different groups going all the time –a drawing group on one side of the room and a painting group on the other side. New students must set up on the drawing side and prove their mettle before moving on.
Another distinction of his class was that drawing students must draw with charcoal on one large charcoal toned piece of paper attached to a drawing board. Here’s the kicker – poses were quick poses and to start the next drawing you must ERASE the last drawing you just did. This was jarring at first but it was ultimately incredibly freeing because there’s nothing left to focus on but the drawing process, forgetting entirely about product.
The really big a-ha I got from Nelson’s class was to change my thinking about how to start. Nelson taught us a system of drawing that starts inside out instead of outside in. An overly simplified description of his method is that you basically start with a stick figure (!!!), beginning with the longest center line within the masses of your subject, then the second longest line and so on.
Then you add lines between points on the subject that give you information on gesture and volume. For example, drawing a line to represent the slant across the top of the model’s shoulders can help you start to capture the model’s stance. Keep adding relational lines around the outside of the subject – for example, foot to foot or hand to foot or hip to hand, etc, – until evidence of the volume or mass of the subject emerges. The main thing is that every time you touch the paper you are drawing a straight line to show center, length, relative position and/or gesture. You don’t draw ANY curved lines until very late in the game.
Obviously, this is a major simplification of what I learned in his class and knowledge of anatomy is helpful to learning this style of drawing as quickly as possible. I had a 45 minute train ride to and from the ASL and would read anatomy books on the train each way. Even though Bridgman’s style of drawing is more mass focused that line focused, I found that reading Bridgman’s drawing books on the train before Nelson’s class were particularly helpful in reinforcing whatever I learned. Vanderpoel’s book on the Human Figure was also very helpful.
The main point of this post: prior to Nelson’s class, I always drew outside in – trying to capture the masses first. Learning to draw inside out helped me progress more quickly and helped me have better success with the gesture and the proportion of the model. Incidentally, this approach can also work for landscape painting. The horizon line is often the longest line, then where’s the tallest object relative to the horizon, where’s the second longest and the second tallest, etc.
A lot of great artists start their drawing outside in – perhaps my most influential painting teacher of all, Burt Silverman, starts outside in. Burt just automatically sees masses and the related gestures of the masses. Also, eventually a drawing becomes a combination of inside out and outside in but it was very helpful to spend a semester using a very disciplined approach to starting one way and thinking a lot about it the entire time. So really – everyone needs to experiment to find a drawing system that works best for them.
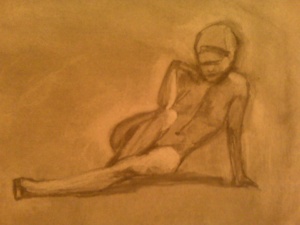
I’ll end this post with my dirty little secret: we weren’t allowed to take photos in class mostly because of the privacy of the models but also because we were discouraged from getting attached to the results of our efforts. However on rare occasions I would sneak my drawing board out in the hallway and take a quick photo before erasing it if I felt like I had a break through moment with a particular drawing. Here’s a photo of a two-minute drawing I did toward the end of my fabulous first semester at the ASL with Nelson. You may be able to visualize that the longest starting line for this drawing is the left shoulder to the left toe although I erased the inner lines before taking this photo (sorry – I didn’t realize in 2009 I’d be using it in a blog post 7 years later!). It’s obviously not perfect, the left femur is too long for starters, but I like the gesture and generally I like the drawing and did I mention that I did it in 2 minutes? – there’s no way I could have done this before taking Nelson’s class. I probably couldn’t do this in two minutes now since I’m not doing quick drawings for three hours every day!
Thank you Nelson. I wish I could have had more time with you. I couldn’t take the following spring semester with Nelson where I MIGHT have been allowed to paint (I wouldn’t have minded if I had to stay on the drawing side) but I had to go back to teach in Boston for the spring. That was the last year that Nelson taught at the league so I felt very, very lucky to have had that brief time in his class. However his wonderful protégée, Dan Thompson took over his class and I continued on with him for as long as I could. Dan is also one of the finest teachers I have ever had in any subject, ever. If you can free up a few months to treat yourself to a learning experience you won’t forget, find a way to get yourself to the Art Student’s League. You won’t regret it!